
Nearly one in six british adults experience some degree of hearing loss, yet many struggle with hearing aid issues that could be prevented or resolved at home. Simple checks and basic maintenance often make a significant difference long before expert help is needed. This step by step guide shows how easy it can be to prepare, clean, adjust, and test your hearing aids while helping you know exactly when professional support is truly necessary.
Table of Contents
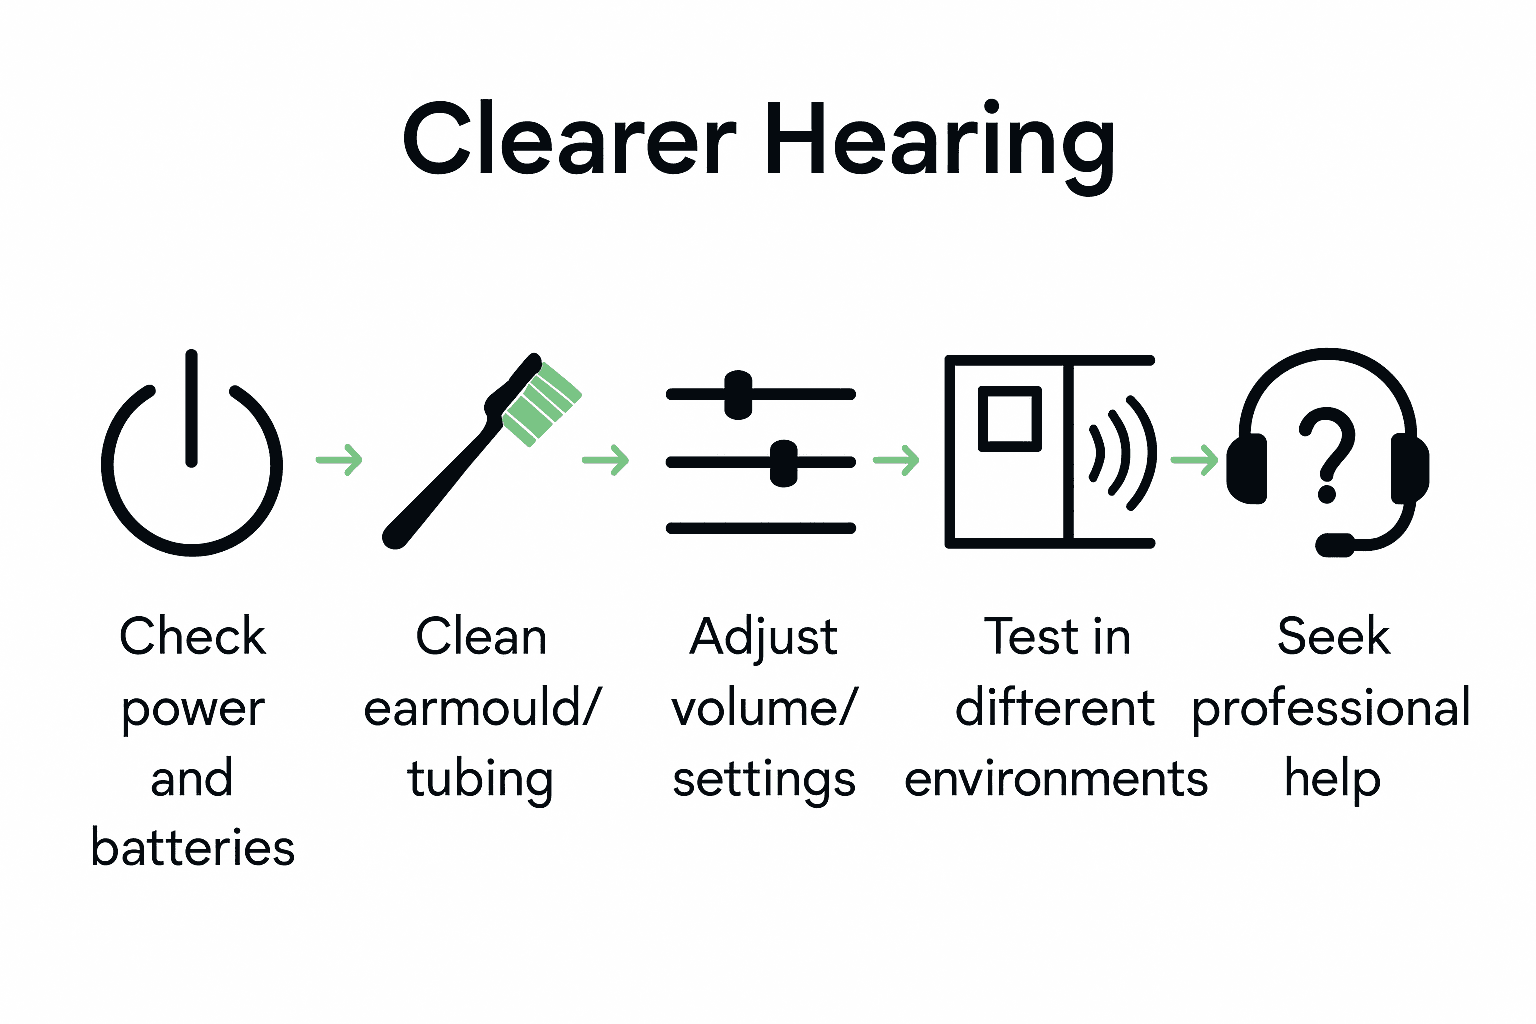
- Step 1: Prepare Your Hearing Aids For Troubleshooting
- Step 2: Check And Clean Key Components
- Step 3: Adjust Settings For Optimal Performance
- Step 4: Test Functionality And Listen For Improvement
- Step 5: Seek Further Support If Issues Persist
Quick Summary
| Essential Insight | Clarification |
|---|---|
| 1. Ensure Hearing Aids Are On | Begin troubleshooting by confirming your hearing aids are powered on and correctly set, including proper battery insertion and volume levels. |
| 2. Clean and Inspect Key Components | Regularly clean earmould and tubing to prevent blockages and maintain sound quality; use warm, soapy water and avoid harsh chemicals. |
| 3. Adjust Settings Gradually | Modify volume and sound settings in quiet environments, making small adjustments to ensure comfort and clarity of sound. |
| 4. Systematically Test Functionality | Evaluate your hearing aids’ performance in various environments, listening for distinct sounds to assess clarity and effectiveness. |
| 5. Seek Professional Help If Needed | If problems persist, document specific issues and contact your audiology provider for further evaluation and support. |
Step 1: Prepare your hearing aids for troubleshooting
Before diving into complex repairs, you need a systematic approach to preparing your hearing aids for troubleshooting. The goal is to eliminate simple issues and set the stage for more targeted diagnostics. According to RNID, several basic checks are critical before proceeding further.
First, confirm that your hearing device is switched on and functioning correctly. The Rotherham NHS Trust recommends verifying three fundamental aspects: power status, battery insertion, and proper ear placement. Check that the battery is correctly inserted with no signs of corrosion or damage. Ensure the volume is set at an appropriate level and that the device isn’t accidentally set to the hearing loop setting.
A pro tip when preparing for troubleshooting: always work in a well-lit, clean area with a soft surface to prevent accidental damage if you drop components. Keep a small magnifying glass nearby to inspect intricate parts, and have a clean microfibre cloth ready to gently wipe down your device. By methodically preparing your hearing aid, you increase the likelihood of identifying and resolving issues quickly and efficiently.
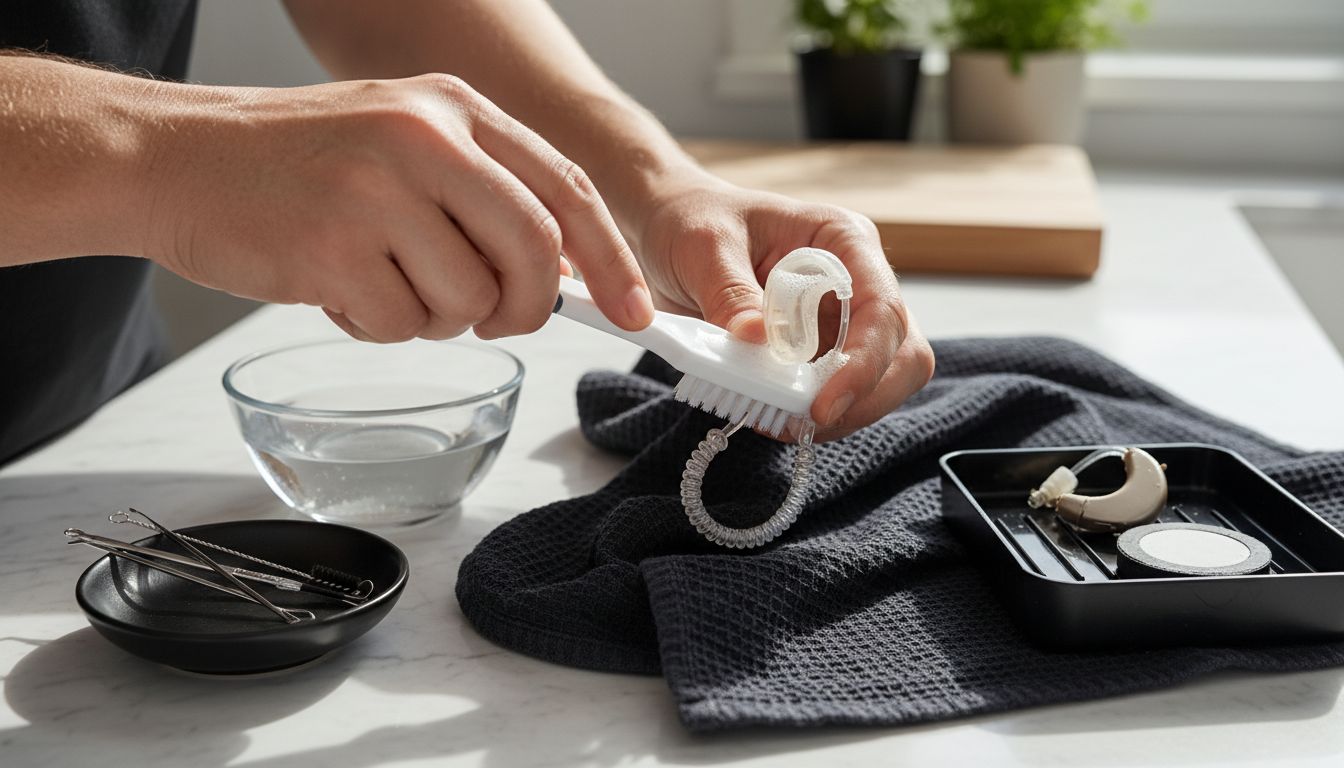
Step 2: Check and clean key components
Ensuring your hearing aid components are clean and functional is crucial for maintaining optimal performance. In this step, you will systematically inspect and clean the most critical parts of your hearing device to prevent potential sound disruptions and extend its lifespan. St Georges NHS recommends a thorough and careful cleaning approach to preserve your device.
Start by focusing on the earmould and tubing. According to The Rotherham NHS Trust, you should carefully inspect the tubing for any blockages, moisture, or wax accumulation. When cleaning the earmould, use warm water and a mild soap solution. Gently wash the component using a soft nailbrush to remove accumulated earwax, then rinse thoroughly and allow it to air dry completely before reattaching to the hearing aid.
A critical tip when cleaning: never use alcohol based solutions or harsh chemicals, as these can damage the delicate components of your hearing aid. Always use a soft dry cloth for exterior surfaces, and consider using specialised hearing aid cleaning tools for precision work. Consistent gentle maintenance will help ensure your device remains in top condition and delivers clear, reliable sound.
Step 3: Adjust settings for optimal performance
Finding the right hearing aid settings is a personalised journey that requires patience and careful adjustment. Your goal is to create a comfortable listening experience that adapts to different sound environments. RNID recommends a gradual approach to adapting to your new hearing device, starting with quiet settings and progressively expanding your auditory experience.
Begin by carefully checking your volume control and sound settings. The Rotherham NHS Trust emphasises the importance of ensuring your volume is set appropriately and that your device is not accidentally switched to an unintended setting like the hearing loop mode. Start in a quiet environment where you can focus on fine tuning without external distractions. Experiment with different volume levels and programme settings, paying close attention to sound clarity and your personal comfort.
A crucial tip when adjusting settings is to make incremental changes. Avoid dramatic shifts in volume or programme settings that might overwhelm your auditory system. If possible, ask a family member or friend to help you assess how different settings sound from an external perspective. Remember that finding your perfect hearing aid configuration is a process of gradual refinement, not an instant solution.
Step 4: Test functionality and listen for improvement
Testing your hearing aid is a critical step in ensuring it delivers the sound quality you need for daily communication. This stage is about systematically verifying your device’s performance across different listening environments. RNID recommends carefully listening to everyday noises to assess the effectiveness of your hearing aids and confirm they are functioning correctly.
According to The Rotherham NHS Trust, you should methodically test your hearing aid by exposing yourself to various sounds and critically evaluating their clarity. Start in a quiet room, then progressively move to more challenging environments like a moderately busy kitchen or living room. Listen for nuanced sounds like the rustling of newspaper, the soft click of a light switch, or the subtle background hum of household appliances. Pay close attention to how well you can distinguish between different sound frequencies and volumes.
A crucial testing tip is to involve a trusted friend or family member during this process. Their external perspective can help you understand how well you are hearing and responding to sounds. They can speak at different volumes and distances, allowing you to calibrate your hearing aid’s performance. Remember that adjusting to a new hearing aid is a gradual process, and what might seem imperfect today will likely improve with patience and practice.
Step 5: Seek further support if issues persist
Despite your best troubleshooting efforts, some hearing aid challenges require professional intervention. This final step is about recognising when you need expert assistance and taking proactive steps to resolve ongoing technical or performance issues. RNID advises that if problems continue after your initial troubleshooting attempts, you should contact your hearing aid provider for professional support and potential repair services.
According to The Rotherham NHS Trust, persistent problems warrant reaching out to the Audiology Department to schedule a comprehensive evaluation. Prepare for your support consultation by documenting specific issues you are experiencing. Note details such as when the problems occur, what sounds are affected, and any unusual behaviours your device exhibits. This information will help technicians diagnose and resolve your concerns more efficiently.
A critical tip is to remain patient and systematic. Professional hearing specialists have extensive experience addressing complex hearing aid challenges. Do not feel discouraged if your initial troubleshooting did not resolve everything. Each interaction brings you closer to achieving optimal hearing performance, and professional support is a valuable resource in your hearing health journey.
Experience Clearer Hearing with Advanced Solutions from Audora
If you have been following the “Hearing Aid Troubleshooting Guide for Clearer Sound,” you understand how critical it is to maintain and adjust your hearing aids for the best performance. Common challenges include battery issues, sound clarity, and device settings that demand a personalised touch and reliable technology. At the heart of these concerns is the need for a hearing device that adapts to your lifestyle, offers comfort, and reduces the hassle of constant manual adjustments.

Discover how Audora’s innovative range of AI-powered hearing aids can simplify your hearing experience. Designed with rechargeable batteries, smartphone app controls, and discreet in-ear designs, these devices eliminate many typical issues that cause frustration. Take control now by exploring the Home page 00Audora, where transparency in pricing meets high-quality performance. Act swiftly to benefit from our current offers during National Hearing Week. Embark on your hearing health journey with confidence at GetAudora.co.uk. Make a change today for clearer, more natural sound.
Frequently Asked Questions
How can I prepare my hearing aids for troubleshooting?
To prepare your hearing aids, ensure they are switched on, and check the battery placement for any corrosion. Clean the device in a well-lit area, using a soft surface to avoid damage, and have a magnifying glass and microfibre cloth ready for intricate inspections.
What should I clean on my hearing aid to ensure optimal performance?
Focus on cleaning the earmould and tubing, checking for blockages or moisture. Use warm water and mild soap, then allow the components to air dry thoroughly before reattaching them.
How do I adjust the settings on my hearing aid for better sound quality?
Start by checking the volume control and sound settings, then adjust them gradually in a quiet environment. Experiment with different volume levels and programme settings to fine-tune your listening experience.
What should I listen for when testing my hearing aid’s functionality?
When testing, pay attention to clarity in various environments, starting from quiet spaces to more challenging settings like a busy kitchen. Listen for nuances in sound frequencies and volume, and involve a family member to provide feedback.
When should I seek professional support for my hearing aid?
If issues persist after your initial troubleshooting, it’s time to seek professional help. Document specific problems you experience, such as unusual behaviours or times when the device fails, and contact your audiology department for a comprehensive evaluation.
What steps can I take to document hearing aid issues for a professional consultation?
Record details about the specific issues, including when they occur and what sounds are affected. Prepare a list of unusual behaviours to share with the technician during your consultation for faster diagnosis.