
Nearly one in six British adults faces hearing loss, yet so many feel overwhelmed by the prospect of maintaining their devices without expert help. Staying independent and protecting your investment starts with simple cleaning practices you can do at home. This step-by-step guide makes it easy to gather safe supplies, handle your hearing aids gently, and follow trusted NHS techniques for long-lasting results.
Table of Contents
- Step 1: Gather Essential Cleaning Supplies Safely
- Step 2: Remove Hearing Aids Correctly From Ears
- Step 3: Wipe Outer Surfaces With Approved Materials
- Step 4: Clear Wax And Debris From Tiny Openings
- Step 5: Check And Test Devices Before Reinserting
Quick Summary
| Key Point | Explanation |
|---|---|
| 1. Gather the right supplies | Use soft microfibre cloths, alcohol-free wipes, and disposable gloves to clean your hearing aids safely. |
| 2. Remove hearing aids gently | Carefully extract your hearing devices from your ears to avoid damage; use a consistent routine for safety. |
| 3. Clean with approved materials | Use safe materials to wipe surfaces and avoid moisture build-up that could harm device components. |
| 4. Clear wax from openings | Use special cleaning tools to gently remove wax, ensuring not to damage sensitive parts of the hearing aids. |
| 5. Inspect before reinserting | Check your devices thoroughly for any damage or debris before putting them back in your ears to maintain optimal function. |
Step 1: Gather essential cleaning supplies safely
You will now collect all necessary items to clean your hearing aids safely and effectively. This step involves selecting appropriate cleaning materials while prioritising your health and protecting delicate hearing aid components.
Start by assembling your cleaning kit with gentle supplies specifically designed for hearing devices. Gather soft microfibre cloths, alcohol-free cleaning wipes, a small soft-bristled brush (like a clean makeup brush), and distilled water. Always wear disposable gloves to protect your hands and prevent transferring oils or bacteria from your skin onto the hearing aids. Safety guidelines from HSE emphasise using personal protective equipment when handling cleaning materials, so choose non-latex gloves if you have sensitivity.
Avoid harsh chemicals or household cleaning products that could damage your hearing aids. The NHS healthcare cleanliness standards recommend selecting materials compatible with delicate medical equipment. Check manufacturer instructions for recommended cleaning solutions or specialised wipes designed specifically for hearing aid maintenance.
Top Tip: Keep your cleaning supplies in a dedicated sealed container to maintain hygiene and prevent contamination between cleaning sessions.
Here is a summary of cleaning supplies and their purposes for hearing aid maintenance:
| Cleaning Supply | Purpose | Special Considerations |
|---|---|---|
| Microfibre cloth | Removes dust and oils | Should be lint-free and soft |
| Alcohol-free cleaning wipes | Cleans without damaging components | Avoid wipes with harsh chemicals |
| Soft-bristled brush | Dislodges debris from crevices | Use only gentle pressure |
| Distilled water | Dampens cloths safely | Do not submerge the device |
| Disposable gloves | Prevents bacteria transfer | Non-latex if sensitive |
Step 2: Remove hearing aids correctly from ears
Removing hearing aids requires gentle precision and care to prevent damage to your delicate device and protect your ear canal. This step will guide you through carefully extracting your hearing aids without risking harm to the equipment or your ears.
Begin by washing and thoroughly drying your hands to prevent transferring dirt or oils onto the device. For behind-the-ear models, gently grasp the device from behind your ear, carefully pulling it away from your ear canal while supporting the outer ear with your other hand. Detailed NHS guidance emphasises careful device handling to avoid potential damage or discomfort. If you have an in-ear model, use a soft twisting motion while gently pulling to create a seal break, ensuring you do not tug or pull forcefully.
When removing your hearing aids, always handle them over a soft surface like a towel to prevent accidental dropping. If you experience any difficulty or discomfort during removal, stop immediately and consult your hearing healthcare professional. Healthcare professionals recommend professional support for complex removal techniques, especially with custom in-ear devices.
Top Tip: Create a consistent removal routine in the same location every time to minimise the risk of misplacing or accidentally dropping your hearing aids.
The following table contrasts in-ear and behind-the-ear hearing aids during the removal process:
| Removal Aspect | In-Ear Model | Behind-the-Ear Model |
|---|---|---|
| Technique | Soft twist and pull | Gentle pull from behind the ear |
| Risk of Damage | Sensitive to seal break force | Vulnerable to drops |
| Support Area | Grip device, avoid ear canal stress | Support outer ear with other hand |
| Additional Challenge | Can become lodged if fitted deeply | Easier to drop during removal |
Step 3: Wipe outer surfaces with approved materials
Your hearing aids require careful and precise cleaning to maintain their performance and longevity. This step focuses on safely removing surface dirt and debris using appropriate cleaning materials that protect your device’s delicate components.

Cleaning guidelines for sensitive electronics recommend using soft microfibre cloths or specialised electronic cleaning wipes. Gently wipe the entire exterior surface of your hearing aid using light, sweeping motions to remove dust particles and accumulated oils. Avoid saturating the device with liquid and ensure your cloth is only slightly dampened. For stubborn dirt, use a soft cleaning brush provided with your device to carefully remove debris from crevices and microphone openings.
Recommended cleaning protocols emphasise wearing disposable gloves during the cleaning process to prevent transferring additional oils or bacteria onto your hearing aid. Always inspect the device after cleaning to ensure no moisture remains and that all components appear clean and undamaged. Pay special attention to the microphone and speaker areas, which can easily collect microscopic debris that might affect sound quality.
Top Tip: Clean your hearing aids at the same time each day to establish a consistent maintenance routine that becomes second nature.
Step 4: Clear wax and debris from tiny openings
Removing wax and microscopic debris from your hearing aid requires precision and gentle handling to prevent damage to its delicate components. This crucial step ensures optimal sound transmission and prevents potential long-term performance issues.
NHS cleaning guidelines recommend using the specific cleaning tube provided with your hearing aid to carefully clear thin tubes and openings. Insert the cleaning tube gently without applying excessive force, paying close attention to microphone and speaker ports. Use a soft cleaning brush to softly remove visible debris, holding the device with the opening facing downwards to allow any loose particles to fall away naturally. Avoid using sharp objects or pushing anything deep into the device’s tiny openings.
Earwax management principles suggest being cautious about moisture when clearing blockages. If wax appears stubborn, consult your hearing healthcare professional rather than attempting aggressive cleaning. Some hearing aids feature replaceable wax guards or filters designed to prevent buildup. When these become visibly blocked or discoloured, replace them according to the manufacturer’s instructions to maintain optimal device performance.
Top Tip: Invest in a small magnifying glass to help you inspect tiny openings more accurately during your cleaning routine.
Step 5: Check and test devices before reinserting
Before returning your hearing aids to your ears, a thorough inspection and testing process ensures optimal performance and prevents potential sound quality or functionality issues. This critical step helps you identify any problems that might have occurred during the cleaning process.
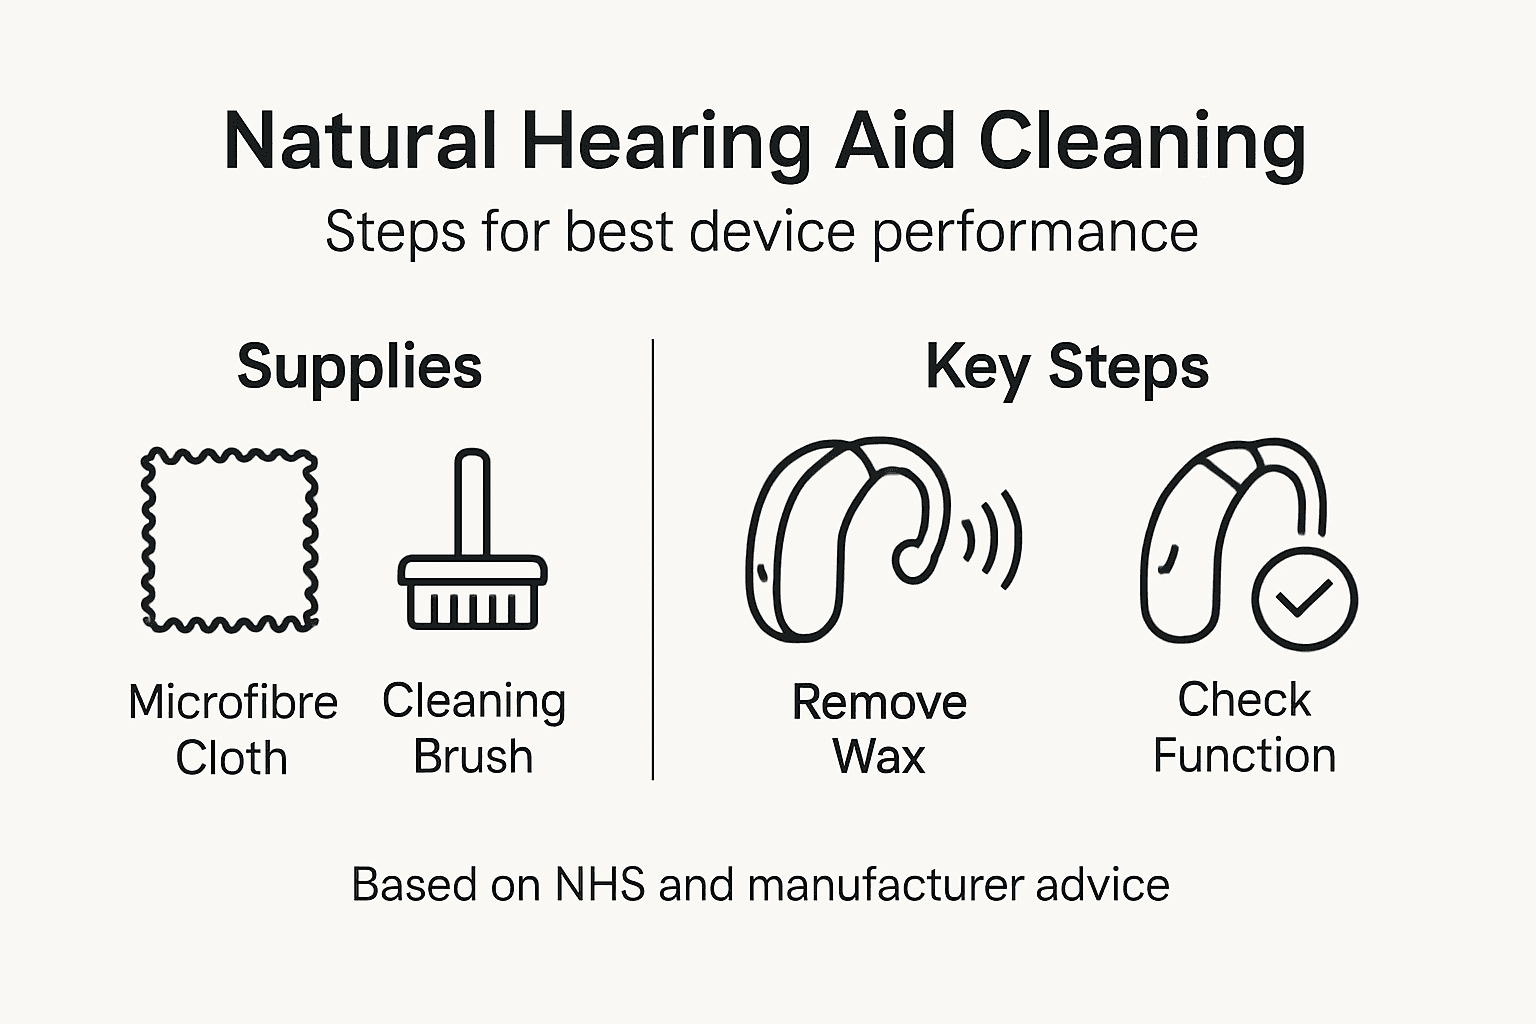
Hearing aid insertion guidelines recommend carefully examining the dome and tubing for any signs of damage or debris. Visually inspect the entire device under good lighting, checking for cracks, discolouration, or accumulated wax. Gently tap the device to ensure all components are secure. Turn on the hearing aid and listen for clear sound quality test the volume levels. Most modern devices will produce a soft beep or tone when activated correctly.
Equipment maintenance protocols suggest paying special attention to battery compartments and connection points. Ensure the battery contacts are clean and free from corrosion. If you notice any unusual sounds like crackling or intermittent audio, or if the device fails to turn on consistently, contact your hearing healthcare professional for a more detailed assessment. A quick functional check before reinsertion can save you from potential discomfort or hearing interruptions.
Top Tip: Keep a small notebook nearby to log any recurring issues or changes in your hearing aid performance during your cleaning routine.
Keep Your Hearing Aids Performing at Their Best with Audora
Cleaning your hearing aids naturally and safely is essential to ensure clear sound and long-lasting performance. If you have experienced the frustration of wax buildup, delicate device handling, or worrying about damage from harsh chemicals this guide has you covered. Maintaining your hearing aids with soft brushes, alcohol-free wipes and gentle techniques will protect your investment every day.
Discover our range of innovative digital hearing aids that provide top-quality sound in sleek, easy-to-clean designs. Our AI-powered devices feature rechargeable batteries and smartphone control for simplicity and convenience. With UKCA certification and direct-to-consumer pricing, you can skip clinic visits and get superior hearing solutions at a fraction of traditional costs.
Make your hearing care effortless today. Visit GetAudora.co.uk to explore all our discreet, reliable hearing aids with full support and warranty. Start enjoying clearer hearing and comfortable maintenance routines now.
Frequently Asked Questions
How can I clean my hearing aids naturally without harsh chemicals?
You can clean your hearing aids naturally by using soft microfibre cloths and distilled water. Gently wipe all surfaces with a slightly damp cloth to remove dirt and oils before reinserting them.
What should I avoid when cleaning my hearing aids to maintain their performance?
Avoid using harsh chemicals or household cleaning products that can damage the delicate components of your hearing aids. Always opt for gentle, approved cleaning materials specifically designed for hearing aids to ensure they remain in optimal condition.
How often should I clean my hearing aids for best performance?
Aim to clean your hearing aids daily to keep them functioning properly and to prevent buildup of wax or dirt. Establish a consistent cleaning routine to maintain their performance over time.
Is it safe to use water when cleaning my hearing aids?
Yes, using distilled water is safe for cleaning your hearing aids, but ensure not to submerge the device. Dampen your microfibre cloth with distilled water, then gently wipe the surfaces.
How do I remove wax and debris from the tiny openings of my hearing aids?
To remove wax and debris, use a soft cleaning brush or a specific cleaning tube provided with your device. Insert the cleaning tool gently into the openings and use light pressure to dislodge any particles without damaging the device.
What steps should I take before reinserting my hearing aids?
Before reinserting your hearing aids, visually inspect them for damage or dirt, and test them to ensure sound quality is clear. Conduct this check to ensure they’re functioning well and reduce the risk of discomfort.